B6/7 S4 Starter Replacement
Procedure Notes: I'm doing this the "official" way by removing the passenger motor mount. After wrestling with the other technique of leaving the motor mount in place and unbolting the solenoid, I finally gave up and removed the motor mount. Took very little time and made this entire job a piece of cake.
If your motor mounts have never been replaced and you have over 50k on your vehicle, I highly recommend you replace the mounts while you're doing this job. You'll already have the passenger mount out so it's just a matter of doing the driver while you're at it, which only takes an hour at most.
- Tools Needed:
- Jackstands and floor jack
- Variety of metric wrenches and sockets (shallow and deep)
- 6mm and 8mm allen (recommend socket style)
- Ratchet extensions and swivel are nice (recommend wobble extensions)
- Breaker bar and/or cheater pipe
- Loctite
- Parts Needed:
- Starter
- Replacement Zip ties
- Replacement hardware for sway bar end links (lower bolt)
- Replacement hardware for sway bar bracket bolts
- Replacement hardware for lower motor mount bracket. 3 bolts total (per side), 1 long (PN: N-909-568-03) and 2 short (PN: N-906-630-02)
- Torque Specs:
- Sway bar end link bolt (do not reuse) (lower): 25 Nm
- Sway bar bracket bolt (do not reuse) (2 per side): 25 Nm
- Starter to transmission bolts (2): 65 Nm
- Ground to starter nut: 22 Nm
- Positive to solenoid nut: 16 Nm
- Axle heat shield bolts (3): 23 Nm
- Upper motor mount bracket bolts (use loctite): 42 Nm
- Bracket to motor mount nut (2): 23 Nm
- Longer bolt on lower motor mount bracket (do not reuse): 110 Nm + 1/4 turn
- Pair of shorter bolts for lower motor mount bracket (do not reuse): 75 Nm
Procedure
- Either put your car on ramps or raise the frontend and put it on jackstands. I preferred here to remove my front wheels because it gave me more room to move around, but is not required. You'll be removing your sway bar, some people like to do that with the car on ramps but it can be done either way. Remove the lower engine cover.
- Pop your hood and remove your battery cover. Grab your 10mm wrench and unbolt the negative battery terminal. Pull it off and stash it somewhere where it isn't going to accidentally jump up and touch the negative battery terminal. You'll be touching lots of bare positive wires during this procedure and we wouldn't want you to get hurt.
- Remove the front sway bar. Starting on the left side, put your jack just under the sway bar where it meets the end link. You'll be removing the 16mm bolt that goes into the sway bar. Lift the jack just enough to support the sway so that when you start loosening the end link bolt the sway bar won't move. Repeat for the right side. The 16mm bolts securing the sway bar to the end links are one-time use bolts and should not be reused. See the top of this procedure for torque specs.
- Unbolt the 4 (2 per side) 13mm nuts holding the sway bar bracket in place and then remove the sway bar and put aside.
- Support the engine by placing your floor jack under the oil pan. With a 2x4 between the pan and jack, lift the engine just enough so it is just supported by the jack. If you see your car start to raise up, you went too far.
- Passenger side motor mount, remove the bracket that the starter wiring harness is secured to by removing the 13mm bolt at the center of the motor mount. Snip any zip ties that are holding the starter wiring hardness to the bracket, remove the bracket and put it aside. The 13mm nut is circled in red in the photo below

- Unbolt the 3 18mm bolts that secure the lower motor mount bracket to the chassis/subframe. Make note of the position of the bolts in the slots. You may want to mark them though I don't think it's necessary. These bolts are one-time use bolts and should not be reused. See the top of this procedure for torque specs. These bolts are on very tight, don't be afraid to bust out a cheater pipe and/or breaker bar. The 18mm bolts are circled in blue in the photo below.

Once unbolted, remove the lower mount bracket and set aside. Once removed, you will be able to clearly see the passenger motor mount with sensor attached to the right. See photo below.
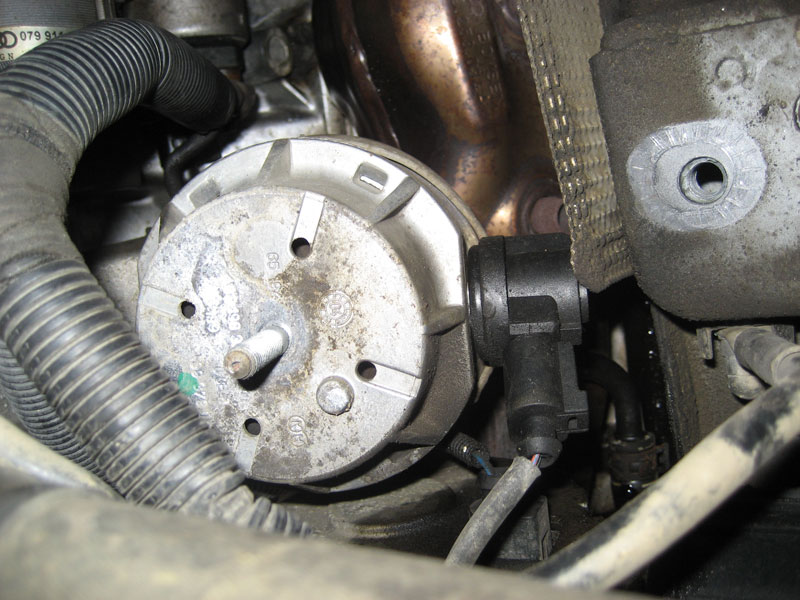
- Disconnect the mount sensor. If you're installing Stern mounts, they come with resistors that you'll plug into the female side (to wiring harness). You'll want zipties so that you can secure the resistor to the wiring harness.
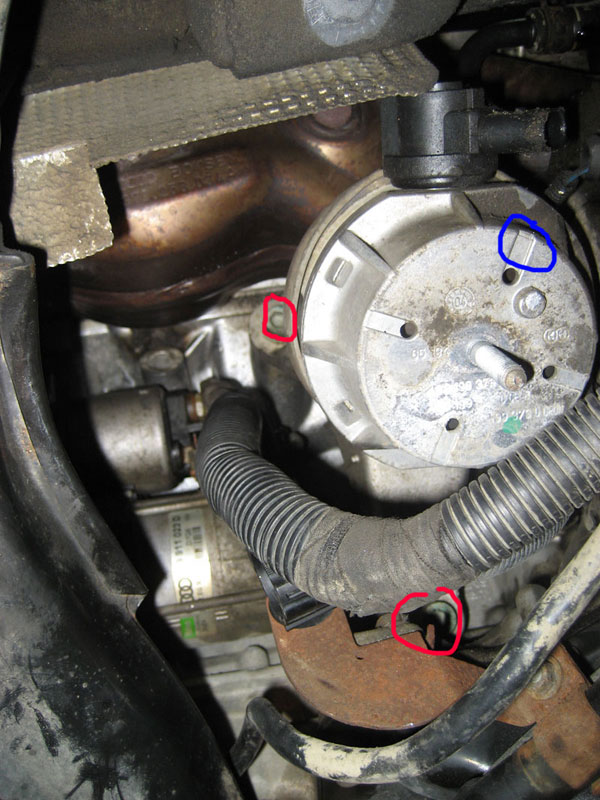
- Unbolt the 3 8mm hex bolts that secure the upper motor mount bracket to the engine block. Two of them are easy to see while the 3rd is a bit hidden. With 1 or 2 wobble extensions and an 8mm allen socket you'll be able to get to all of these bolts no problem. Once all 3 bolts are undone, wrangle the upper motor mount bracket (with motor mount still attached) out of there.
In the photo below you can see 2 of the 3 hex bolts circled in red, the approximate location of the 3rd is shown in blue.
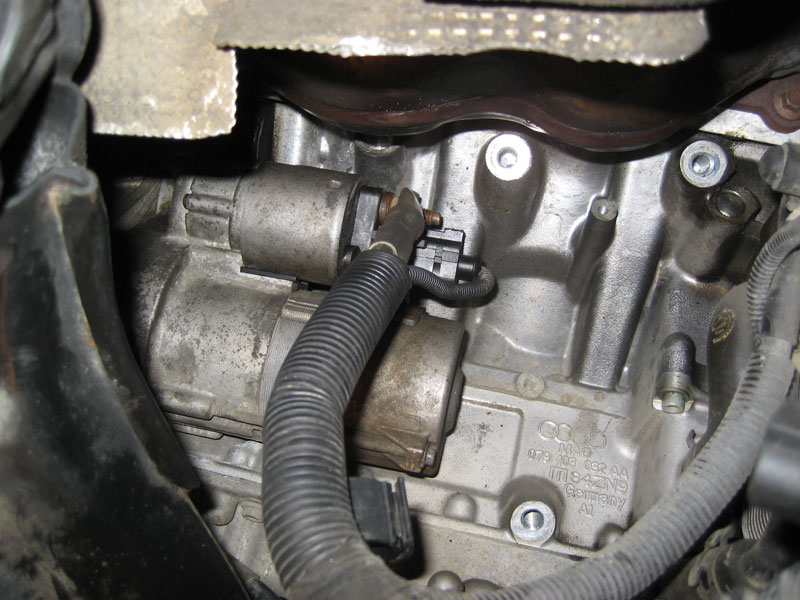
Once the upper mount bracket has been removed, you can clearly see the starter. After you're done unbolting the starter, you'll be pulling it out through this area. See photo.
- Remove the passenger side inner axle shield with your 6mm allen. There are 3 allen bolts holding it on at approximately 9, 12 and 3 o'clock. If you've done your downpipes you already know how much of a bitch the top allen is. I found that with the right combination of extensions (wobble extensions are excellent here) and a swivel, you should be able to get a nice long extension chain that gets your ratchet out in the empty wheel bay area which gives you plenty of room to get good torque on that bolt. This is why we removed the right front wheel.
- Now is a good time to take a look at the starter. There are 2 bolts holding the starter in place. The lower is a pass-through 18mm and the upper is a 16mm that bolts into the starter. In the photo below, you can see the lower pass-through bolt (circled in red) and the negative strap (circled in blue) which is bolted to the starter with a 13mm.
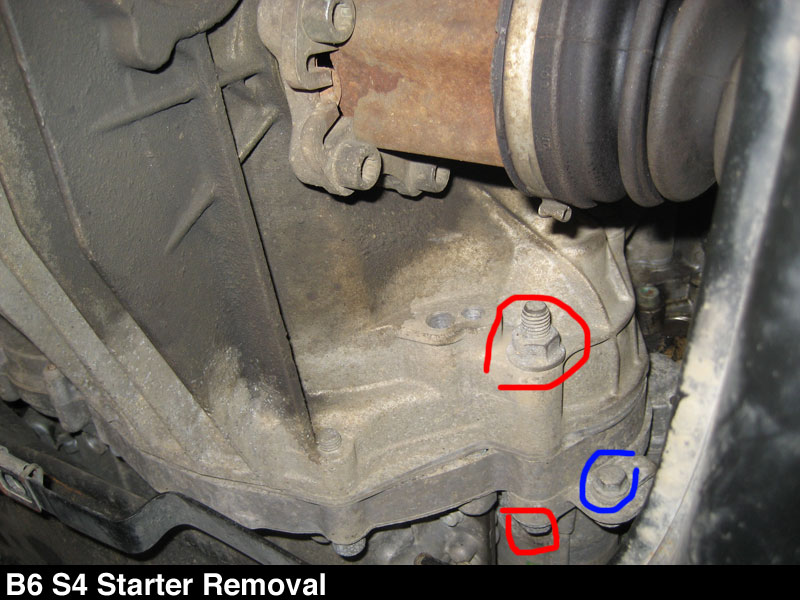
- Remove the 13mm holding the negative strap to the starter and the lower 18mm pass-through bolt. That nut is torqued on really good, use your breaker bar and put your whole body into it. Once it breaks free you'll have to hold the back of the bolt with your 18mm open-end wrench.
- Remove the upper 16mm bolt that is threaded into the starter. Again, use your breaker bar and put everything you've got into it. Below is another shot of the starter but from above the axle so you can see the upper bolt and positive wire going into the solenoid. The lower bolt (18mm) is circled in red, the upper (16mm) is circled in yellow, the negative strap is circled in blue and the positive lead (with smaller switched wire) is shown in blue.
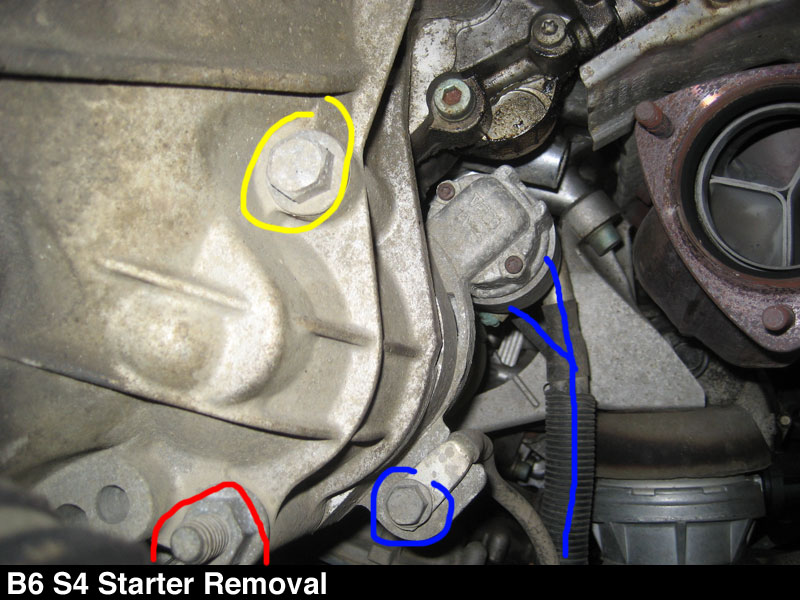
Note that I took this photo before I had removed the motor mount.
- Follow the positive lead down and disconnect the quick connect plastic clips that hold the harness to the chassis. I also clipped all the zip ties that hold the negative strap wire to the positive harness but this might not be needed. I found that it gave me lots more movement with the wiring harness when pulling the starter out.
- Since you've already unbolted your starter, you should be able to pull it out with the two wires still connected. Once the starter is down under the engine, remove the switched wire (small one) and then remove the positive lead (13mm). The switched wire connection is slightly different than your typical VW/Audi electrical connector, stare at it for a bit and you'll figure it out.
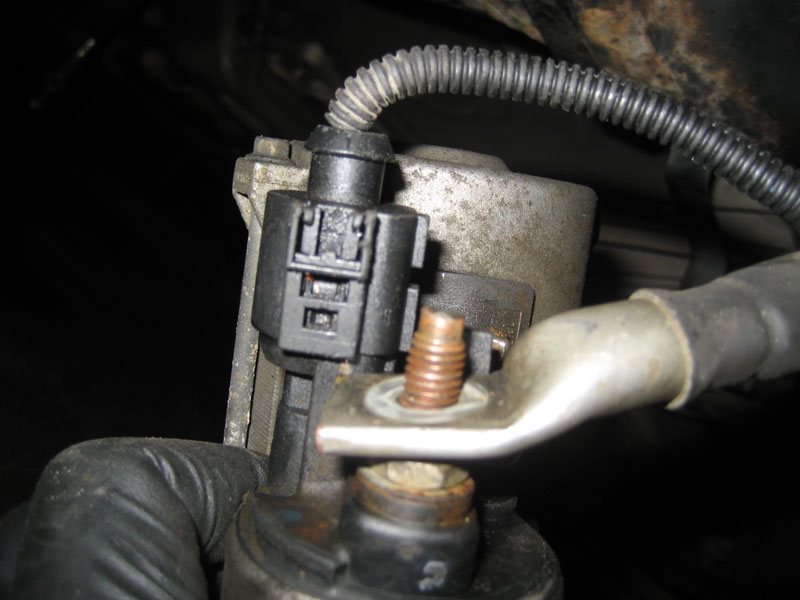
- Grab your new starter and put it all back together in reverse. Torque specs for all bolts are at the top of this procedure. Use loctite on the upper motor mount bracket bolts and replace the lower mount bracket bolts.


